|
This week was a very successful week for my final project. I have finished coding and have run basic tests to ensure that both the circuit, code, and DAW will work in harmony. I was having issues with the reading of “not” states for my play/record switches but by drastically simplifying my code I was able to circumvent the inherent errors in my code (Page 1-2). I also modified my schematic and pin layout so that less calculation is necessary within the code to read and write the correct pins and so that it is less confusing overall (page 3). The circuit will be slightly less clean, but quality soldering and wiring will render this inconsequential. I have also come up with a plan for my PCB and have drawn it up with primitive symbols to represent external components (page 3). I also ordered a couple of extra parts including a socket so that I can easily mount and unmounts my Teensy within the guitar and a panel mount USB cable so that I can create a clean single run from the outside of the guitar into my computer (page 4). I also now plan on using a standard 5-pin MIDI connector and a custom cable to send and receive audio out and into the guitar from my interface. This will include a panel mount female MIDI connector on the guitar and a 4-wire cable with male 5-pin MIDI on one end and two 1⁄4” jacks on the other. Finally, I was able to map my MIDI controls within my Ableton Live session (page 4). All that is left to do is mount the circuit into my guitar and connect it to the guitar electronics.
1 Comment
Using what I have learned in this week’s lab, I was able to finish my Arduino code and began testing it with simple jumper wires to emulate my switches and buttons before I mock up the project with the parts that I will eventually mount to my guitar. Attached is my code. Below is a picture of one of each of my parts. 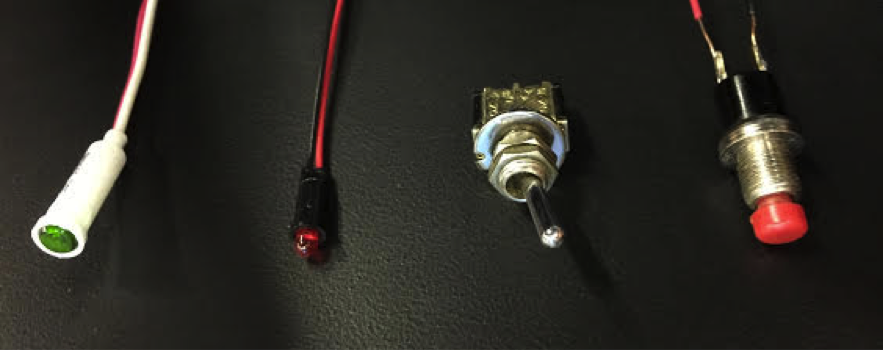 In order, a pushbutton, switch, and red and green LEDs. The LEDs are slightly different than those that I had initially found online and will require external load resistors so that they do not burn out. To allow easy mounting of this slightly additional circuitry, I will mount everything to perfboard and purchase a mounting block for my Teensy so that I can mount it on the board and house it in the guitar to keep everything streamlined. To allow for this, I will also purchase a panel mount USB port to mount near the 1⁄4” output jack of my guitar so that I can run a longer USB tether to my computer without it being snaked from the inside of the guitar. Pictoral representation of the user interface. The guitar is the guitar I will be using: 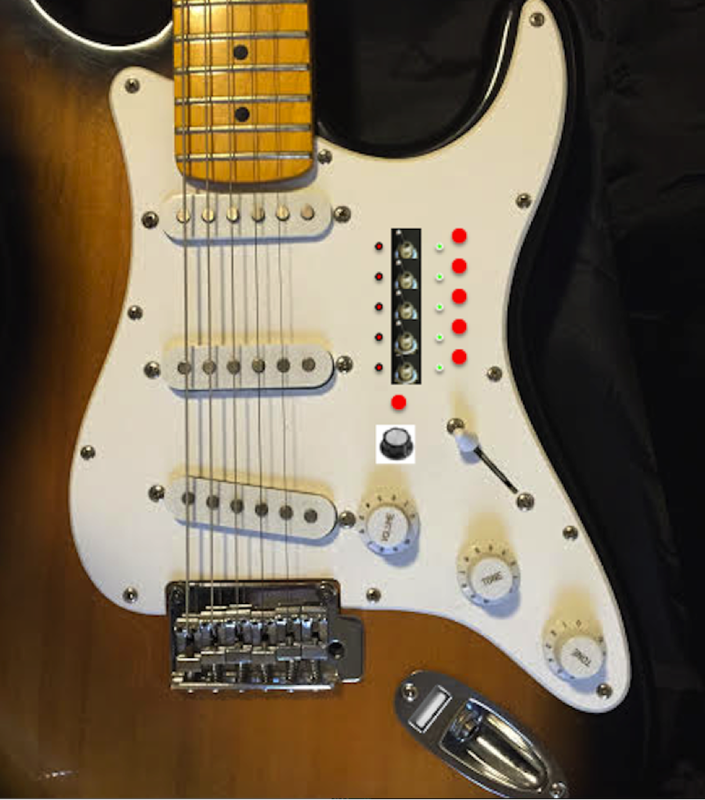 This week, I completed a large chunk of my Arduino code. I have completed the logic that will accept controls from the physical buttons and switches and that which will turn off and on the various on-board indicator lights. Currently, I only have to complete the MIDI interface between the code and the DAW. For this, I simply have to map my DAW controls to MIDI notes and write in these control commands within my code. Before I do this, I am going to have to work more with my user interface in order to ensure that it is intuitive for the user and contains all the control that I outlined in my proposal. This may require mocking up the physical project on my guitar, but I retrieved all of my necessary parts this weekend so this will not be an issue. I was able to source all of my parts from home including the panel-mount indicator LEDs in green and red. On the following pages is my code as it stands. Code to be inputted is inn double slashes as such: //_____(code)______// while comments are delineated as such // __(comment)_ Final Project Progress: So far I am slightly behind schedule with my final project. My DAW file is almost completely set up besides a few mapping nuances that I have to do more research to create (overall stop and play). I have to decide whether or not to perform these operations as duplicate maps in Live or use my Arduino code to set a single button to perform multiple tasks. The decision will be made on the grounds of speed and ease of application. I still have to work on writing my Arduino code but this will depend on how my Live session is structure and from where I am triggering certain actions. Again, here are my weekly goals: 1. Learn Ableton and build Loop session to accept teensy Midi and applicable controls and write Arduino code 2. Build prototype circuit on breadboard and begin debugging/troubleshooting 3. Finish debugging/troubleshooting and begin to finalize circuit on blank PCB 4. Mount circuit on PCB and mount project on the guitar. 5. Finalize aesthetics and practice performing Below is a screenshot of my Live session as it stands now with primitive Key mapping that will eventually be transferred to MIDI maps. 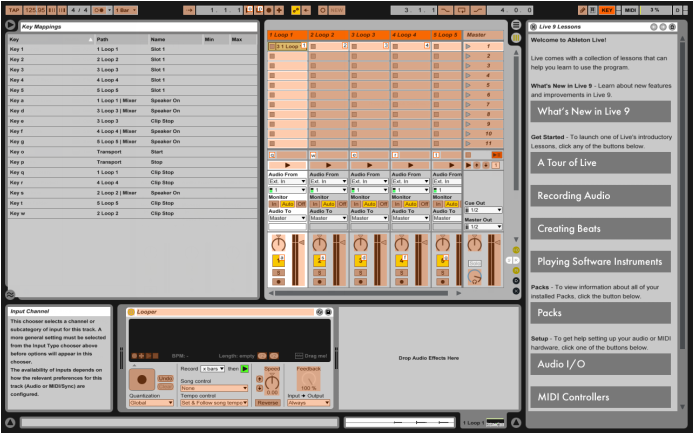 |
 RSS Feed